Header image by Irina Iriser on Unsplash.
This article is part 2 of an ongoing series of "Migrating to TypeScript".
In part 1, we explored how to initialise a project with the TypeScript compiler and the new TypeScript Babel preset. In this part, we'll go through a quick primer of TypeScript's features and what they're for. We'll also learn how to migrate your existing JavaScript project gradually to TypeScript, using an actual code snippet from an existing project. This will get you to learn how to trust the compiler along the way.
Table of contents
- Part 1: Introduction and getting started
- Part 2: Trust the compiler! (you are here)
Thinking in TypeScript
The idea of static typing and type safety in TypeScript might feel overwhelming coming from a dynamic typing background, but it doesn't have to be that way.
The main thing people often tell you about TypeScript is that it's "just JavaScript with types". Since JavaScript is dynamically typed, a lot of features like type coercion is often abused to make use of the dynamic nature of the language. So the idea of type-safety might never come across your average JS developer. This makes the idea of static typing and type safety feel overwhelming, but it doesn't have to be that way.
The trick is to rewire our thinking as we go along. And to do that we need to have a mindset. The primary mindset, as defined in Basarat's book, is Your JavaScript is already TypeScript.
But why is TypeScript important?
A more appropriate question to ask would be "why is static typing in JavaScript important?" Sooner or later, you're going to start writing medium to large-scale apps with JavaScript. When your codebase gets larger, detecting bugs will become a more tedious task. Especially when it's one of those pesky Cant read property 'x' of undefined errors. JavaScript is a dynamically-typed language by nature and it has a lot of its quirks, like null and undefined types, type coercion, and the like. Sooner or later, these tiny quirks will work against you down the road.
Static typing ensures the correctness of your code in order to help detect bugs early. Static type checkers like TypeScript and Flow help reduce the amount of bugs in your code by detecting type errors during compile time. In general, using static typing in your JavaScript code can help prevent about 15% of the bugs that end up in committed code.
TypeScript also provides various productivity enhancements like the ones listed below. You can see these features on editors with first-class TypeScript support like Visual Studio Code.
- Advanced statement completion through IntelliSense
- Smarter code refactoring
- Ability to infer types from usage
- Ability to type-check JavaScript files (and infer types from JSDoc annotations)
Strict mode
TypeScript's "strict mode" is where the meat are of the whole TypeScript ecosystem. The --strict compiler flag, introduced in TypeScript 2.3, activates TypeScript's strict mode. This will set all strict typechecking options to true by default, which includes:
--noImplicitAny- Raise error on expressions and declarations with an implied 'any' type.--noImplicitThis- Raise error on 'this' expressions with an implied 'any' type.--alwaysStrict- Parse in strict mode and emit "use strict" for each source file.--strictBindCallApply- Enable strict 'bind', 'call', and 'apply' methods on functions.--strictNullChecks- Enable strict null checks.--strictFunctionTypes- Enable strict checking of function types.--strictPropertyInitialization- Enable strict checking of property initialization in classes.
When strict is set to true in your tsconfig.json, all of the options above are set to true. If some of these options give you problems, you can override strict mode by overriding the options above one by one. For example:
json
This will enable all strict type-checking options except --strictFunctionTypes and --strictPropertyInitialization. Fiddle around with these options when they give you trouble. Once you get more comfortable with them, slowly re-enable them one by one.
Linting
Linting and static analysis tools are one of the many essential tools for any language. There are currently two popular linting solutions for TypeScript projects.
- TSLint used to be the de-facto tool for linting TypeScript code. It has served the TS community well throughout the years, but it has fallen out of favour as of late. Development seems to have stagnated lately, with the authors even announcing its deprecation recently in favour of ESLint. Even Microsoft themselves have noticed some architectural and performance issues in TSLint as of late, and recommended against it. Which brings me to the next option.
- ESLint - yeah, I know. But hear me out for a second. Despite being a tool solely for linting JavaScript for quite some time, ESLint has been adding more and more features to better support TS. It has announced plans to better support TS through the new typescript-eslint project. It contains a TypeScript parser for ESLint, and even a plugin which ports many TSLint rules into ESLint.
Therefore, ESLint might be the better choice going forward. To learn more about using ESLint for TypeScript, read through the docs of the typescript-eslint project.
A quick primer to TypeScript types
The following section contains some quick references on how TypeScript type system works. For a more detailed guide, read this 2ality blog post on TypeScript's type system.
Applying types
Once you've renamed your .js files to .ts (or .tsx), you can enter type annotations. Type annotations are written using the : TypeName syntax.
tsx
tsx
You can also define return types for a function.
tsx
Primitive & unit types
TypeScript has a few supported primitive types. These are the most basic data types available within the JavaScript language, and to an extent TypeScript as well.
tsx
These primitive types can also be turned into unit types, where values can be their own types.
tsx
Intersection & union types
You can combine two or more types together using intersection and union types.
Union types can be used for types/variables that have have one of several types. This tells TypeScript that "variable/type X can be of either type A or type B."
ts
Intersection types can be used to combine multiple types into one. This tells TypeScript that "variable/type X contains type A and B."
ts
ts
types and interfaces
For defining types of objects with a complex structure, you can use either the type or the interface syntax. Both work essentially the same, with interface being well-suited for object-oriented patterns with classes.
tsx
ts
Generics
Generics provide meaningful type constraints between members.
In the example below, we define an Action type where the type property can be anything that we pass into the generic.
ts
The type that we defined inside the generic will be passed down to the type property. In the example below, type will have a unit type of 'FETCH_USERS'.
ts
Declaration files
You can let TypeScript know that you're trying to describe a some code that exists somewhere in your library (a module, global variables/interfaces, or runtime environments like Node). To do this, we use the declare keyword.
Declaration files always have a .d.ts file extension.
ts
You can include this anywhere in your code, but normally they're included in a declaration file. Declaration files have a .d.ts extension, and are used to declare the types of your own code, or code from other libraries. Normally, projects will include their declaration files in something like a declarations.d.ts file and will not be emitted in your compiled code.
You can also constrain declarations to a certain module in the declare module syntax. For example, here's a module that has a default export called doSomething().
ts
Let's migrate!
Alright, enough with the lectures, let's get down and dirty! We're going to take a look at a real-life project, take a few modules, and convert them to TypeScript.
To do this, I've taken upon the help of my Thai friend named Thai (yeah, I know). He has a massive, web-based rhythm game project named Bemuse, and he's been planning to migrate it to TypeScript. So let's look at some parts of the code and try migrating them to TS where we can.
From .js to .ts
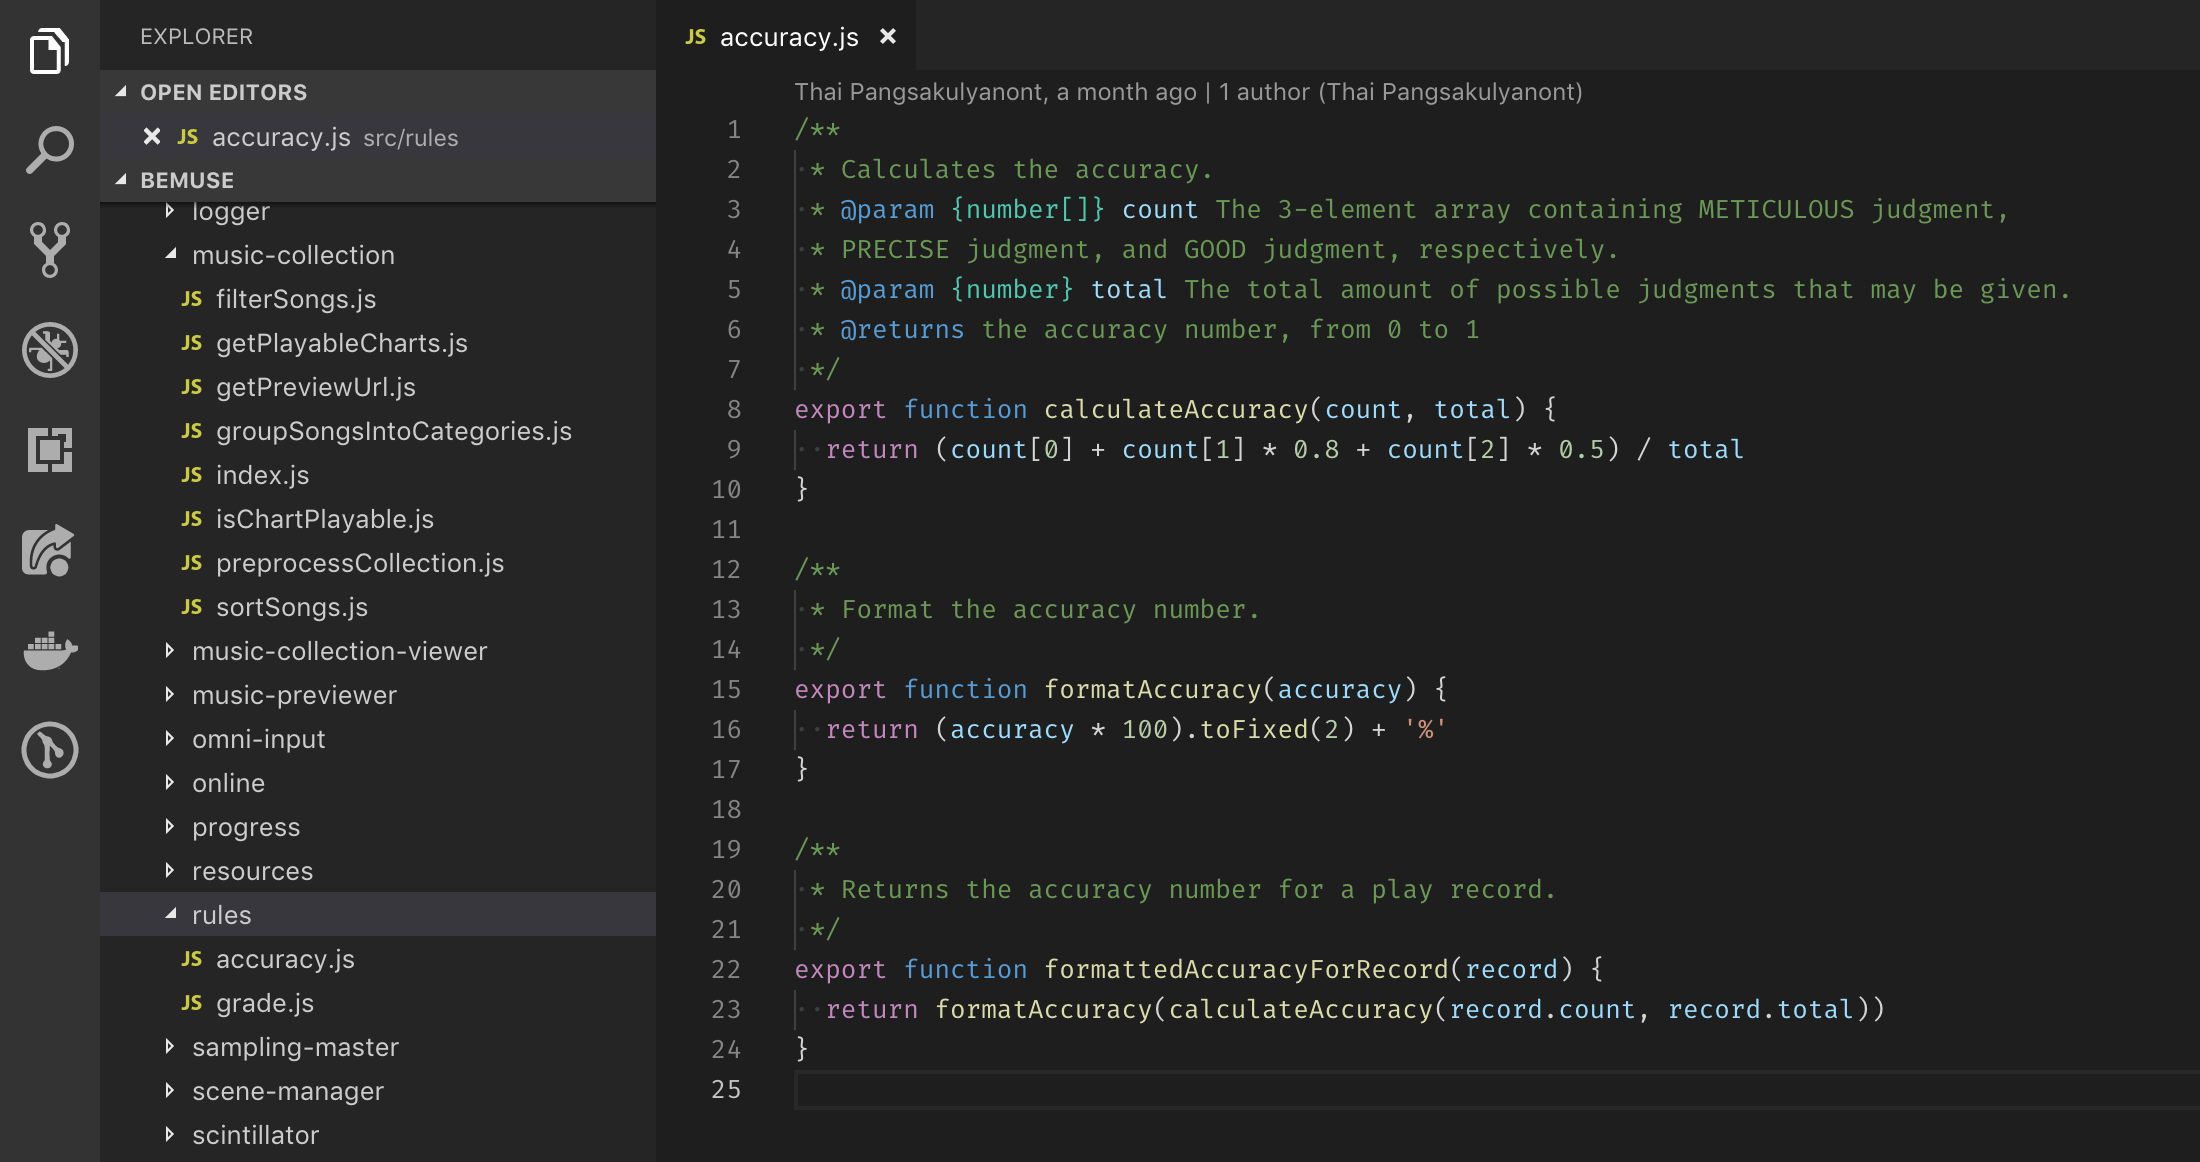
Consider the following module:

Here we have your typical JavaScript module. A simple module with a function type-annotated with JSDoc, and two other non-annotated functions. And we're going to turn this bad boy into TypeScript.
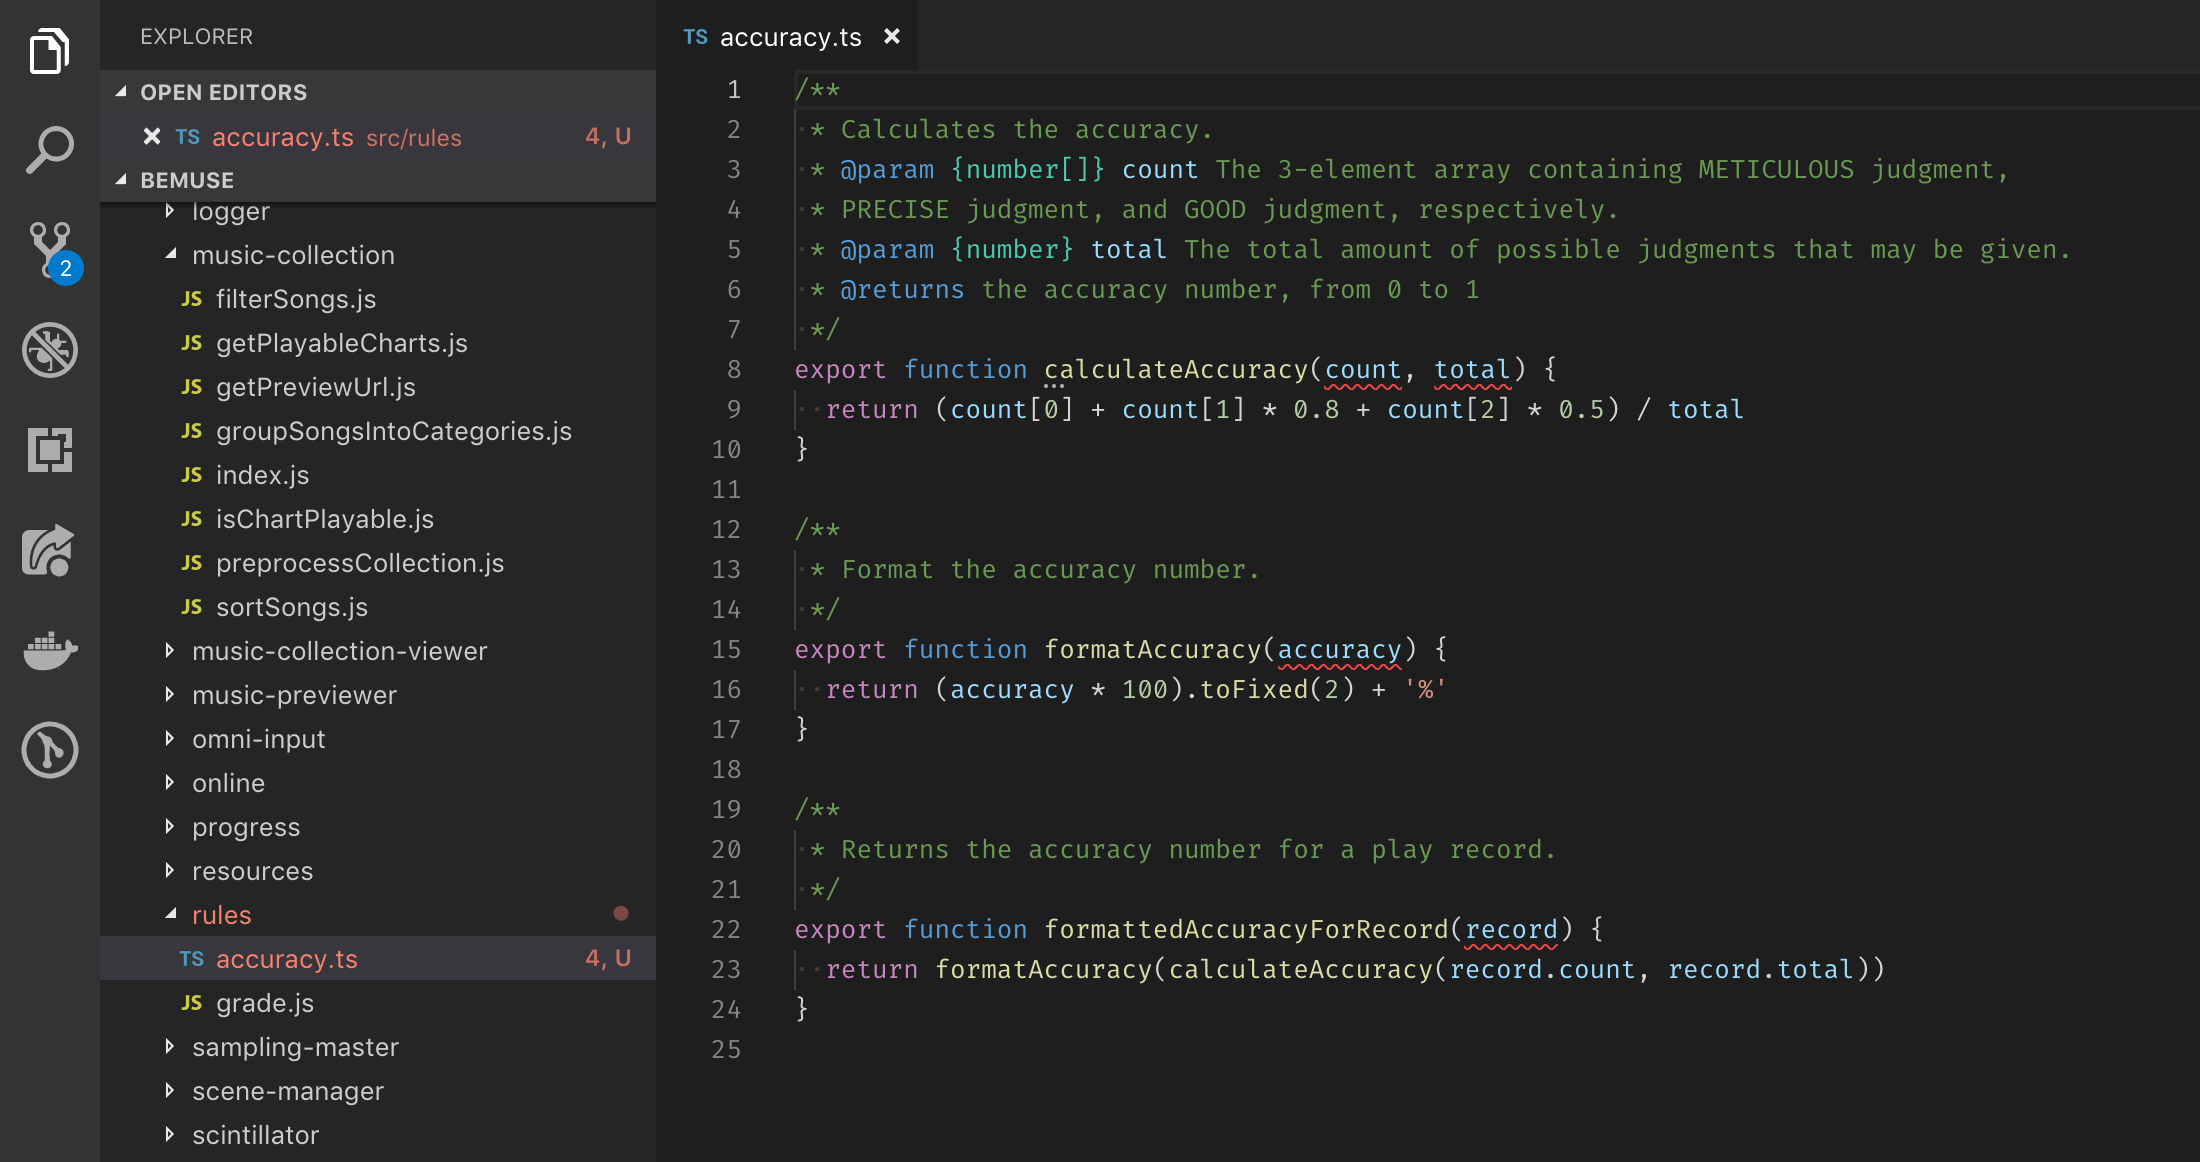
To make a file in your project a TypeScript file, we just need to rename it from .js to .ts. Easy, right?

Oh no! We're starting to see some red! What did we do wrong?
This is fine, actually! We've just enabled our TypeScript type-checking by doing this, so what's left for us is to add types as we see fit.
The first thing to do is to add parameter types to these functions. As a quick way to get started, TypeScript allows us to infer types from usage and include them in our code. If you use Visual Studio Code, click on the lightbulb that appears when your cursor is in the function name, and click on "Infer parameter types from usage".

If your functions/variables are documented using JSDoc, this gets much easier as TS can also infer parameter types from JSDoc annotations.

Note that TypeScript generated a partial object schema for the function at the bottom of this file based on usage. We can use it as a starting point to improve its definition using interfaces and types. For example, let's take a look at this line.
ts
We already know that we have properties count and total in this parameter. To make this code cleaner, we can put this declaration into a separate type/interface. You can include this within the same file, or separately on a file reserved for common types/interfaces, e.g. types.ts
ts
ts
Dealing with external modules
With that out of the way, now we're going to look at how to migrate files with external modules. For a quick example, we have the following module:

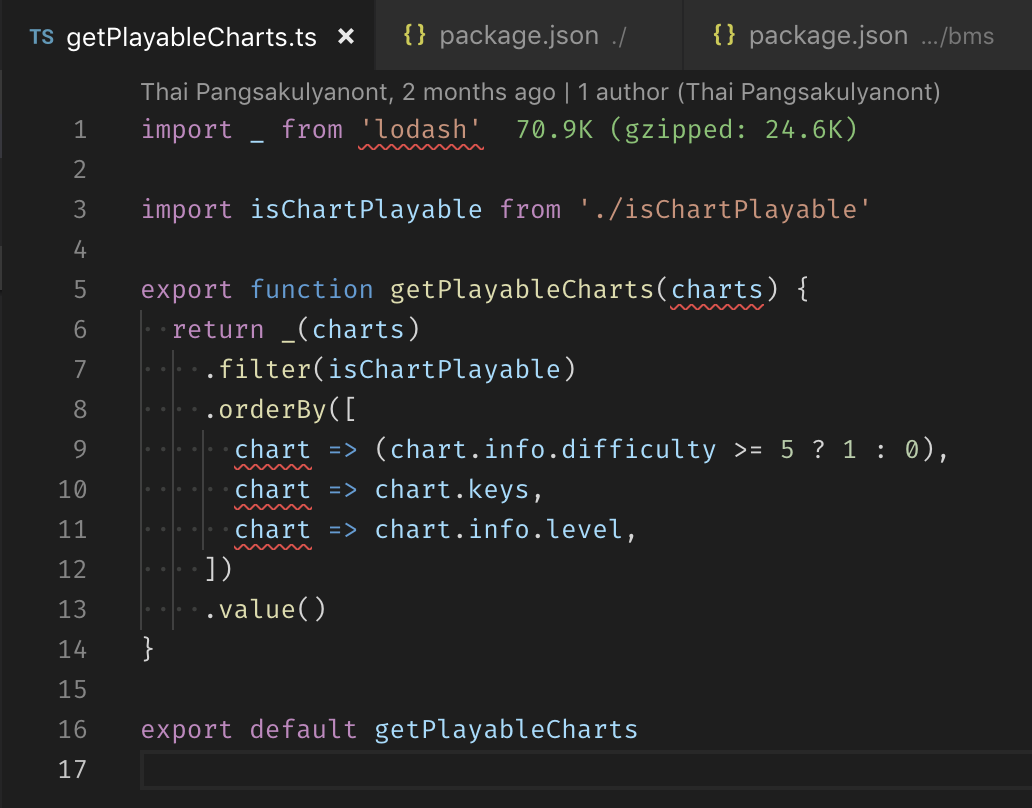
We've just renamed this raw JS file into .ts and we're seeing a few errors. Let's take a look at them.
On the first line, we can see that TypeScript doesn't understand how to deal with the lodash module we imported. If we hovered over the red squiggly line, we can see the following:
As the error message says, all we need to do to fix this error is to install the type declaration for lodash.
bash
This declaration file comes from DefinitelyTyped, an extensive library community-maintained declaration files for the Node runtime, as well as many popular libraries. All of them are autogenerated and published in the @types/ scope on npm.
Some libraries include their own declaration files. If a project is compiled from TypeScript, the declarations will be automatically generated. You can also create declaration files manually for your own library, even when your project is not built using TypeScript. When generating declaration files inside a module, be sure to include them inside a types, or typings key in the package.json. This will make sure the TypeScript compiler knows where to look for the declaration file for said module.
json
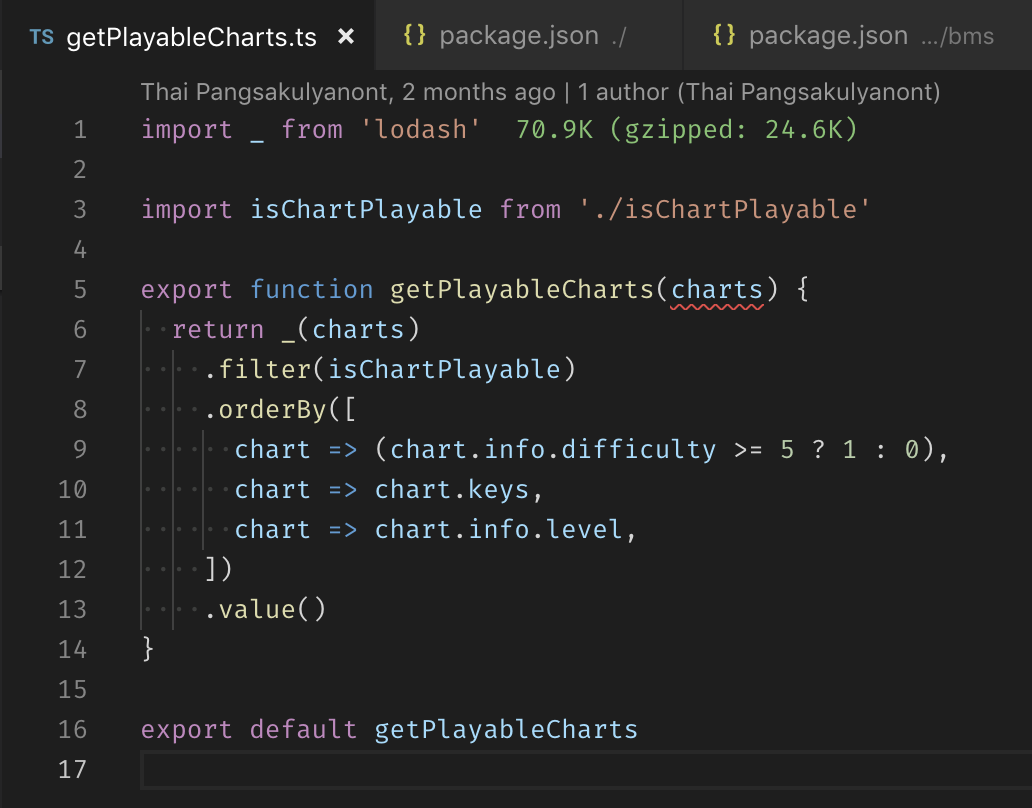
OK, so now we have the type declarations installed, how does our TS file look like?

Whoa, what's this? I thought only one of those errors would be gone? What's happening here?
Another power of TypeScript is that it's able to infer types based on how data flows throughout your module. This is called control-flow based type analysis. This means that TypeScript will know that the chart inside the .orderBy() call comes from what was passed from the previous calls. So the only type error that we have to fix now would be the function parameter.
But what about libraries without type declaration? On the first part of my post, I've come across this comment.

Some packages include their own typings within the project, so oftentimes it will get picked up by the TypeScript compiler. But in case we have neither built-in typings nor @types package for the library, we can create a shim for these libraries using ambient declarations (*.d.ts files).
First, create a folder in your source directory to hold ambient declarations. Call it types/ or something so we can easily find them. Next, create a file to hold our own custom declarations for said library. Usually we use the library name, e.g. evergreen-ui.d.ts.
Now inside the .d.ts file we just created, put the following:
tsx
This will shim the evergreen-ui module so we can import it safely without the "Cannot find module" errors.
Note that this doesn't give you the autocompletion support, so you will have to declare the API for said library manually. This is optional of course, but very useful if you want better autocompletion.
For example, if we were to use Evergreen UI's Button component:
tsx
And that's it for part 2! The full guide concludes here, but if there are any more questions after this post was published, I'll try to answer some of them in part 3.
As a reminder, the #typescript channel on the Reactiflux Discord server has a bunch of lovely people who know TypeScript inside and out. Feel free to hop in and ask any question about TypeScript!